Having come across a Mazda FC shell cheap that still had a majority of the suspension components less the struts, I've decided to embark on swapping the whole front sub-frame over. This means creating new guards as the old ones won't cater for the increase in the track width and either adapting the sub-frame to suit the 323 chassis or vise-versa, which ever is the easiest.
To accommodate the track width of the FC will require several modifications:
Here's the comparison:
Analysis of the RX7FC Suspension

The Standard 323 wheel has a diameter of 575mm compared with the FC 632mm meaning that the center of the tire will be 28.5mm higher off the ground. The stock clearance from the ground to the high point on the Mazda subframe is 345 with std wheels with FC wheels it would be 373.5. The FC subframe Lower Control Arm(LCA) has a center point of 105mm, meaning it would put the LCA pivot point 268.5 from ground level, as opposed to the 316mm on the FC. This will cause the LCA angle to reduce and lower the Roll Center and increase the roll coupling, causing my weight transition during cornering. This will be further exacerbated as I desire to lower the 323 by 90mm. To maintain the correct geometry for the FC Subframe the 323 frame rails need to be alter the frame rails to be 57.5 (60mm) higher than stock and 100mm wider each side.
Measuring Caster on 323:


To accommodate the track width of the FC will require several modifications:
- the center of the strut tops to be moved outward by 38.5mm
- The Frame rails need to be moved outward by 57.5mm
Here's the comparison:
Mazda 323 FA4US Vs FC Dimensions
| ||
Vehicle
|
323
|
Mazda - FC
|
2,311 mm (91.0 in)
|
2,431 mm (95.7 in)
| |
Kingpin Inclination
|
8.3 deg
|
13.45
|
Length
|
3,820 mm (150.4 in)
|
1986-88: 4,290 mm (168.9 in)
|
Width
|
1,595 mm (62.8 in)
|
1,689 mm (66.5 in)
|
812 kg (1,790 lb)
|
1,223–1,413 kg (2,696–3,115 lb)
| |
Wheel size
|
175/70R13
|
205/55R16
|
Offset
|
+20
|
40
|
Camber
|
+1 deg
|
+00.20
|
Caster
|
1 deg 45mins +/- 45mins
|
+04.40
|
Toe-in
|
0 - 6 mm
|
+0.9mm
|
Analysis of the RX7FC Suspension

The Standard 323 wheel has a diameter of 575mm compared with the FC 632mm meaning that the center of the tire will be 28.5mm higher off the ground. The stock clearance from the ground to the high point on the Mazda subframe is 345 with std wheels with FC wheels it would be 373.5. The FC subframe Lower Control Arm(LCA) has a center point of 105mm, meaning it would put the LCA pivot point 268.5 from ground level, as opposed to the 316mm on the FC. This will cause the LCA angle to reduce and lower the Roll Center and increase the roll coupling, causing my weight transition during cornering. This will be further exacerbated as I desire to lower the 323 by 90mm. To maintain the correct geometry for the FC Subframe the 323 frame rails need to be alter the frame rails to be 57.5 (60mm) higher than stock and 100mm wider each side.
Measuring Caster on 323:

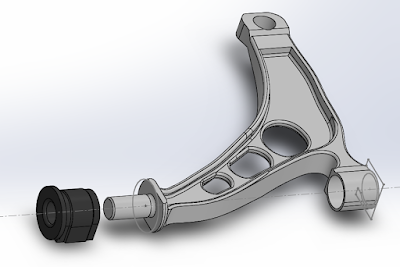
Sketched assembly of the LCA getting closer, need to add the Ball Joint and Sway-Bar link. Once the assembly is completed I'll start designing the bracket and Frame Rail modification required.


Measuring The weight at each corner:
Weight at the tire(Wt) = Surface Area of the tire foot print (S) * Pressure (P)
Modification to an earlier model RX7 (FB)
Handy Suspension links:
http://www.billzilla.org/suspensn.htm
Replacing the front wheel bearings on Mazda FC
http://www.mazdatrix.com/faq/frontbrg.htm
Wheel calculator
https://www.wheel-size.com/calc/?wheel1=205-55-16X6.5ET26&wheel2=225-45-17X7.5ET40&fcl=50mm&wcl=30mm&scl=50mm&sr=0mm
Replacing the front wheel bearings on Mazda FC
http://www.mazdatrix.com/faq/frontbrg.htm
Wheel calculator
https://www.wheel-size.com/calc/?wheel1=205-55-16X6.5ET26&wheel2=225-45-17X7.5ET40&fcl=50mm&wcl=30mm&scl=50mm&sr=0mm
Comments
Post a Comment